Hello all, In today's blog, we are going to learn about policy as code in Kubernetes using Kyverno. Let's get started.
What is Policy as Code?
Policy as Code (PaC) is the idea of writing code in a high-level language to manage and automate policies. The DevOps team can adopt the best practices by representing policies as code, such as version control, automated testing, and automated deployment. You can use these policies in audit or enforcement mode to monitor existing workloads, services for misconfiguration or prevent the misconfigurations applying in the cluster.
Policy as Code in Kubernetes
Policies could be established for multiple areas of your operational environments. You want your Kubernetes clusters to be reliable and secure and you want to control who has access to what. You also want to enforce rules for your kubernetes resources. There are specific things you want to enforce Kubernetes workloads from security, configuration, deployment best practices, operational concerns, governance and compliance requirements.
The three categories in the policy for kubernetes:
- Standard policies - Best practices across the cluster in the organizations
- E.g: Requiring resources to specify the resource limits. Prevent workloads from running as root, etc
- Organization policies - Enforce the policies specific to your organization
- E.g - Enforce the private image repository list to pull, Labels such as application name, environment to specify in workloads, policies with organization complian and audit requirements.
- Environment policies - Enforce the policies specific to the environment
- E.g - Stricter security enforcement in production cluster
Kyverno - Policy Engine
Kyverno (Greek for "govern") is a policy engine designed specifically for Kubernetes. The features are
- policies as Kubernetes resources in YAML (no new language to learn!)
- validate, mutate, or generate any resource using Kustomize overlays
- match resources using label selectors and wildcards
- block non-conformant resources using admission controls, or report policy violations
- test policies and validate resources using the Kyverno CLI, in your CI/CD pipeline, before applying them to your cluster
How does it work?
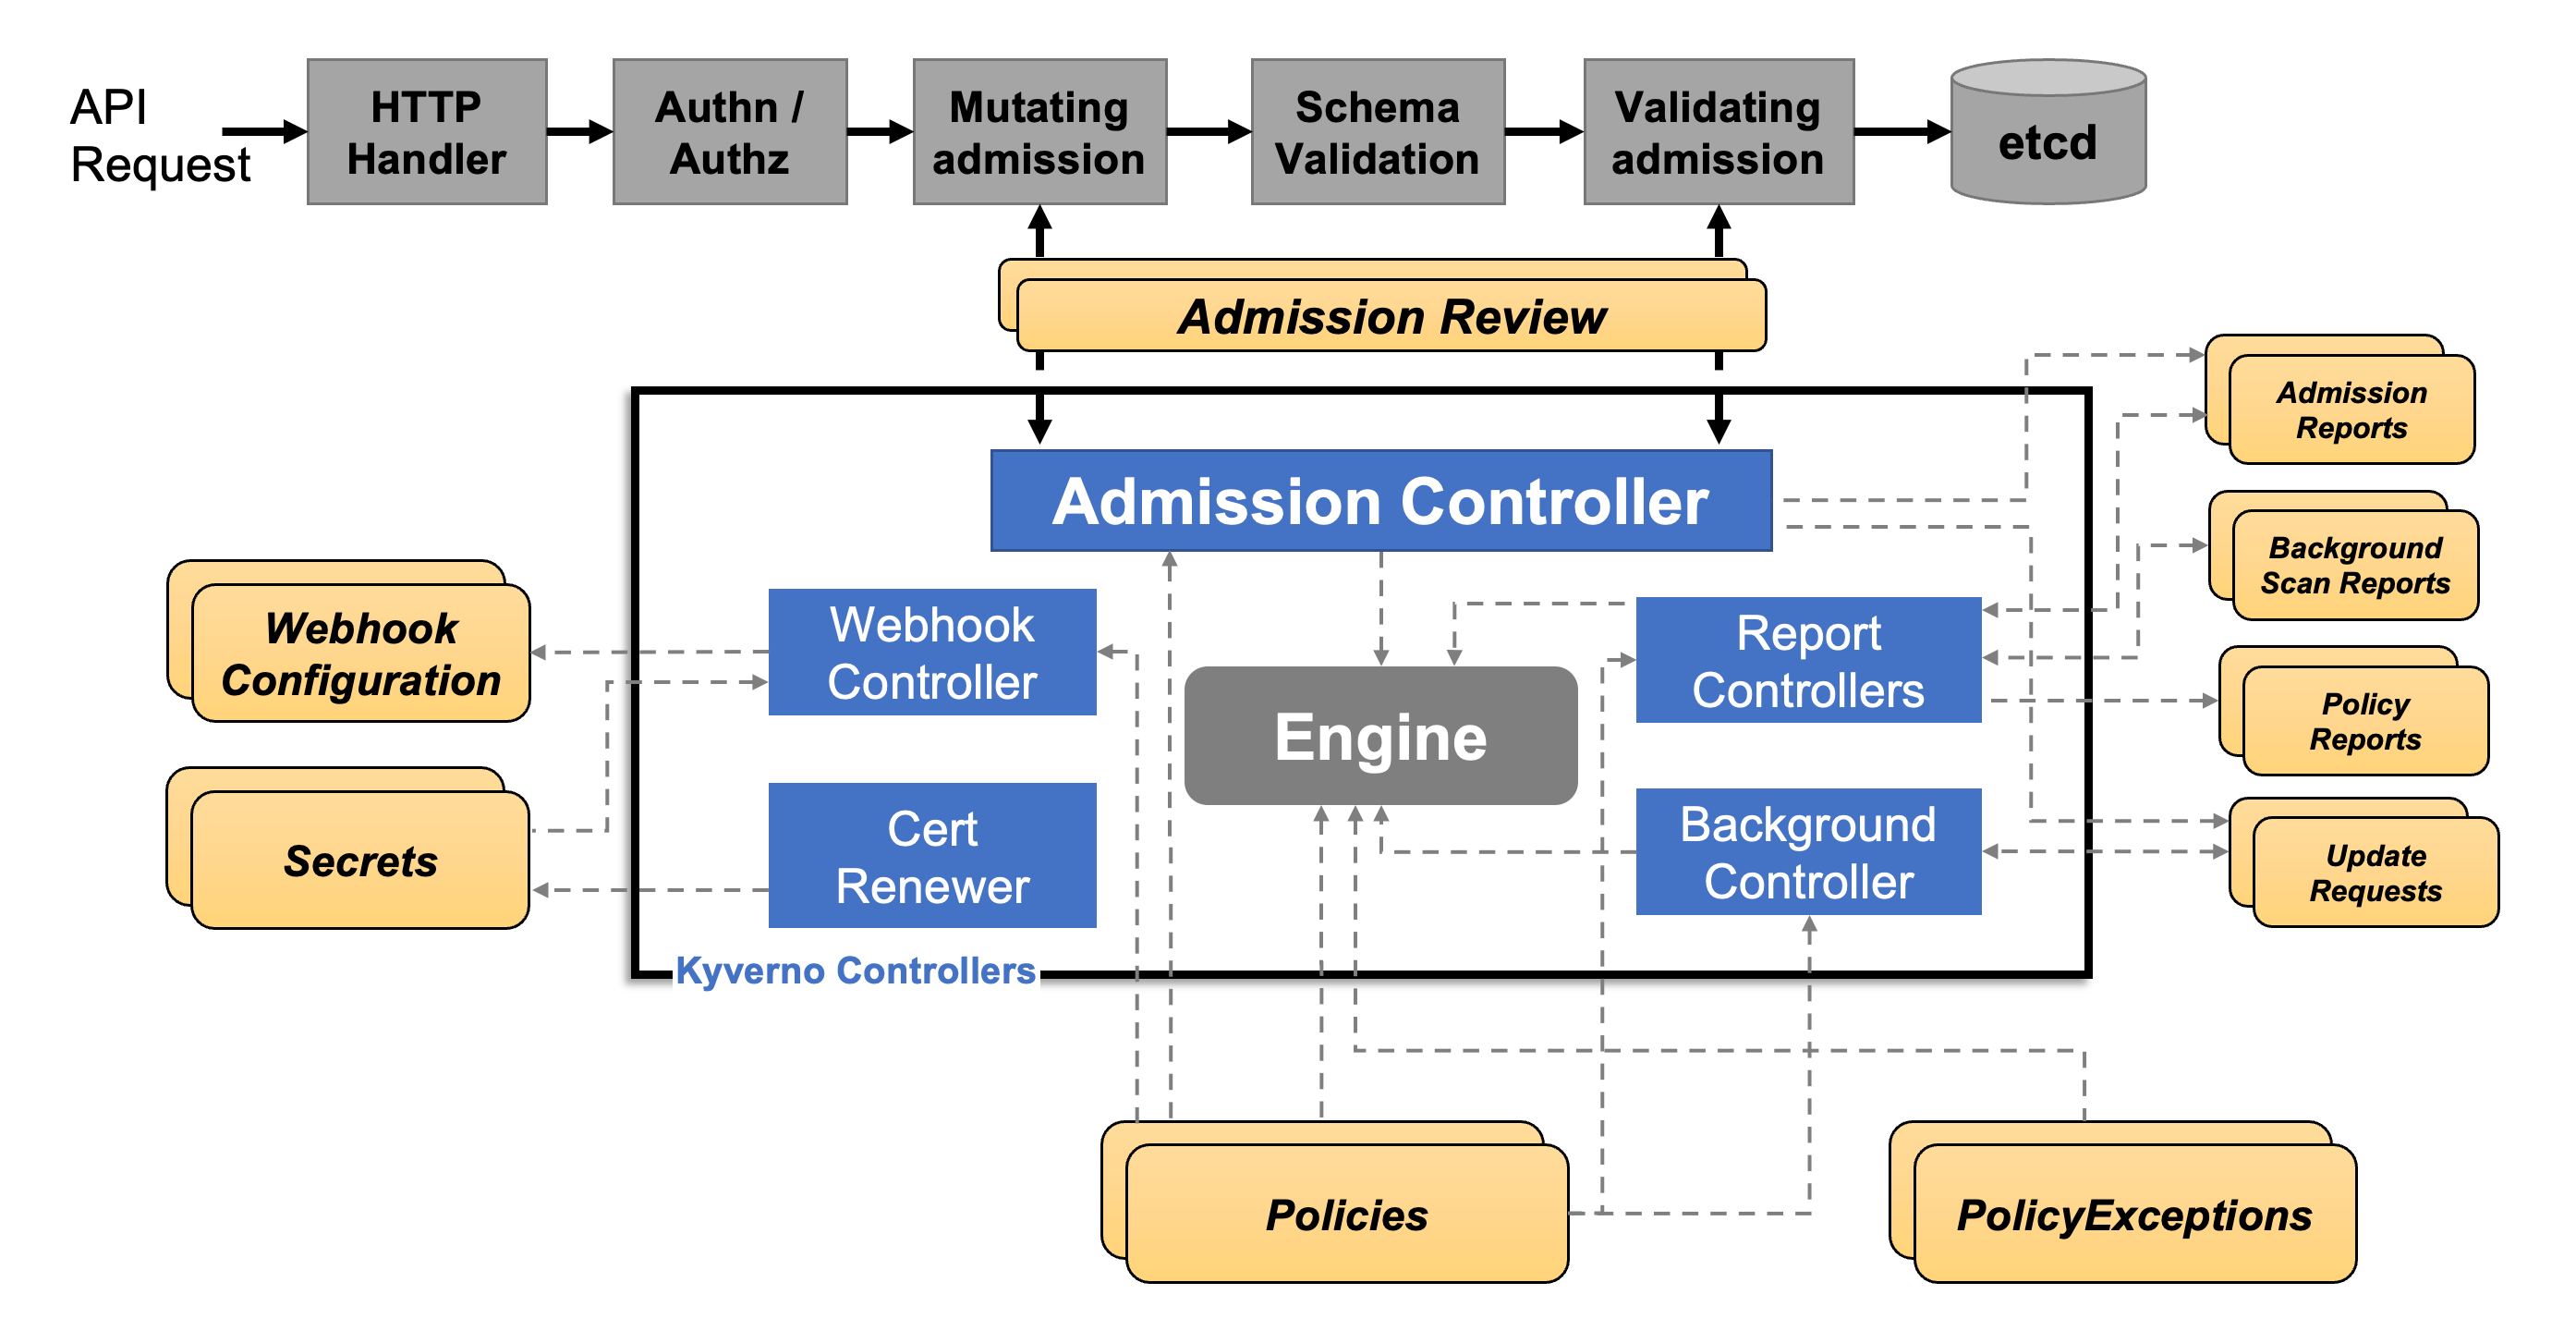
Kyverno runs as a dynamic admission controller in a Kubernetes cluster. Kyverno receives validating and mutating admission webhook HTTP callbacks from the kube-apiserver and applies matching policies to return results that enforce admission policies or reject requests.

Getting Started
The prerequisite for this tutorial is a functional kubernetes cluster. You can create the EKS cluster using the eksctl tool.
apiVersion: eksctl.io/v1alpha5
kind: ClusterConfig

metadata:
  name: eks-k8s-policy-demo
  region: us-east-1

availabilityZones:
  - us-east-1a
  - us-east-1b

managedNodeGroups:
  - name: eks-k8s-policy-demo-ng
    instanceType: t3.medium
    minSize: 1
    maxSize: 5
Policies and Usecases
The Kyverno team created the best practices and most used policies in this website here. There are three different policy types.
- Validate
- Mutate
- Generate
We will see the demo on the below use cases and policies we can enforce for kubernetes deployments.
- Enforce "application name" label in the pod
- Require Limits and Requests
- Add network policy
Enforce "Application Name" label in the pod
apiVersion: kyverno.io/v1
kind: ClusterPolicy
metadata:
  name: require-labels
spec:
  validationFailureAction: enforce
  rules:
  - name: check-for-labels
    match:
      resources:
        kinds:
        - Pod
    validate:
      message: "The label `app.kubernetes.io/name` is required."
      pattern:
        metadata:
          labels:
            app.kubernetes.io/name: "?*"
Let's see how this policy. works by creating the deployment in the pod. Apply the above policy in your cluster. Create a inflate deployment in the cluster without any labels.
➜  kyverno-demo git:(main) ✗  kubectl create deployment inflate --image=public.ecr.aws/eks-distro/kubernetes/pause:3.2
error: failed to create deployment: admission webhook "validate.kyverno.svc" denied the request:

resource Deployment/default/inflate was blocked due to the following policies

require-labels:
  autogen-check-for-labels: 'validation error: The label `app.kubernetes.io/name`
    is required. Rule autogen-check-for-labels failed at path /spec/template/metadata/labels/app.kubernetes.io/name/'
Now, let's create the deployment with app.kubernetes.io/name label.
apiVersion: apps/v1
kind: Deployment
metadata:
  labels:
    app.kubernetes.io/name: inflate
  name: inflate
spec:
  replicas: 1
  selector:
    matchLabels:
      app.kubernetes.io/name: inflate
  template:
    metadata:
      labels:
        app.kubernetes.io/name: inflate
    spec:
      containers:
      - image: public.ecr.aws/eks-distro/kubernetes/pause:3.2
        name: pause

➜  kyverno-demo git:(main) ✗  kubectl apply -f deployment.yaml
deployment.apps/inflate created
Require Limits and Requests
apiVersion: kyverno.io/v1
kind: ClusterPolicy
metadata:
  name: require-requests-limits
spec:
  validationFailureAction: enforce
  rules:
  - name: validate-resources
    match:
      resources:
        kinds:
        - Pod
    validate:
      message: "CPU and memory resource requests and limits are required."
      pattern:
        spec:
          containers:
          - resources:
              requests:
                memory: "?*"
                cpu: "?*"
              limits:
                memory: "?*"
These policies are validation type policies. It validates the specific pattern in your kubernetes api objects.
Add network policy
apiVersion: kyverno.io/v1
kind: ClusterPolicy
metadata:
  name: add-networkpolicy
spec:
  validationFailureAction: enforce
  rules:
  - name: default-deny
    match:
      resources:
        kinds:
        - Namespace
    generate:
      kind: NetworkPolicy
      name: default-deny
      namespace: "{{request.object.metadata.name}}"
      synchronize: true
      data:
        spec:
          # select all pods in the namespace
          podSelector: {}
          # deny all traffic
          policyTypes:
          - Ingress
          - Egress
Monitoring - Dashboard
Kyverno has its metrics exposed through Prometheus metrics endpoint. You can scrape the kyverno metrics or display in grafana dashboard. Kyverno has the policy reporter UI that can target different channels. Checkout here.

Shift Left
You can validate the policies before applying the cluster using cli. I've integrated kyverno cli action in github before deploying yaml files in kubernetes cluster.
- name: Validate policy
        uses: gbaeke/kyverno-cli@v1
        with:
          command: |
            kyverno apply ./policies --resource=./k8s/2048.yaml

After fixing the YAML files

Conclusion
You can improve the security posture for your clusters with policies as code using Kyverno. No need to learn new language to create or manager policies. It works with your existing tools such as git, kustomize, kubectl etc.
I'm Siva - working as Sr. Software Architect at Computer Enterprises Inc from Orlando. I'm an AWS Community builder, Auth0 Ambassador and I am going to write a lot about Cloud, Containers, IoT, and Devops. If you are interested in any of that, make sure to follow me if you haven’t already. Please follow me @ksivamuthu Twitter or check out my blogs at https://blog.sivamuthukumar.com!
